Component Failure Field Guide
Symptom-by-symptom triage for parts that fail while the panels still look new.
- Volume
- 03
- Order
- № 10
- Read
- 8 min
- Tags
- appendix · inventory
- Published
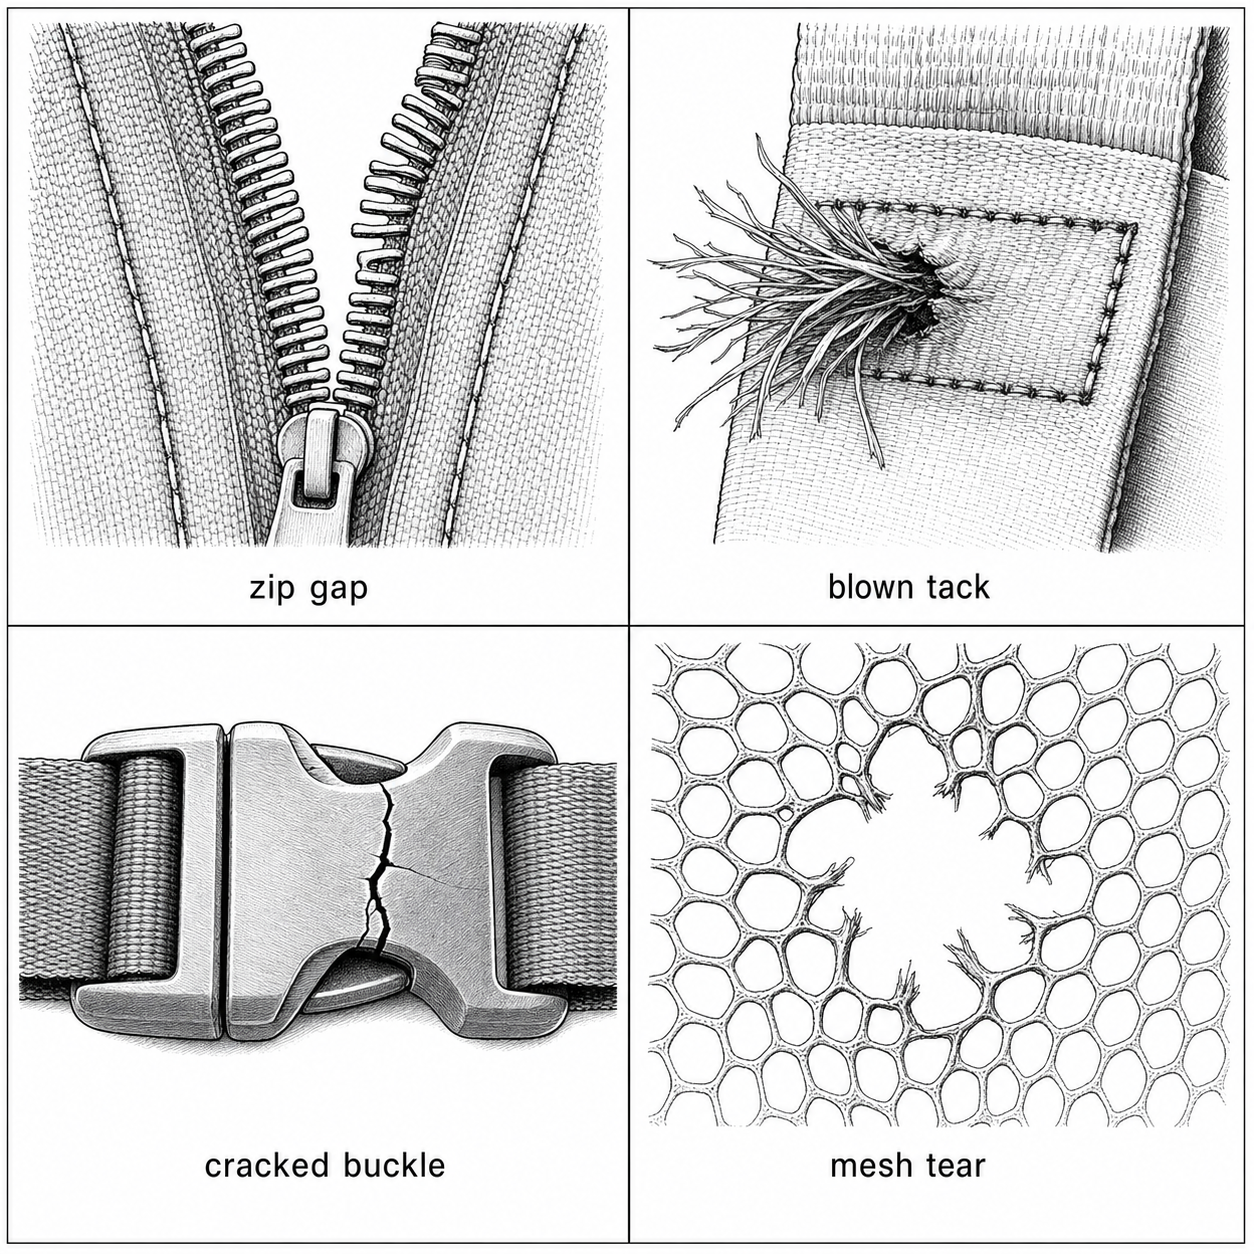 What to look for when the bag still looks fine. Illustrative only.
A part-by-part reference for what fails, what it looks like, what caused it, and when to retire or repair. No invented pass/fail thresholds - these are observational diagnostics.
Zippers
| Failure Mode | What It Looks Like | Likely Cause | When to Act |
|---|---|---|---|
| Coil distortion | Slider travels but chain does not close; chain springs open behind slider | Lateral overload, over-stuffed compartment, sharp fold through chain | Replace slider first; if chain still won’t close, the chain is distorted and the zipper needs replacement |
| Slider pull-off | Slider separates from chain end; chain pops out of slider body | Worn slider channel geometry; end stop failure; forceful overrun | Replace slider with correct gauge; inspect end stops |
| Stop failure | Slider runs off chain end | End stop detached or failed at crimp | Re-crimp or replace stops; or replace full zipper assembly |
| Tape separation | Chain floats free of tape edge; zipper assembly peels from panel seam | Tape adhesion failure; cyclic twist/torsion load at zipper end | Seam repair if panel fabric is intact; full replacement if tape is delaminated along run |
| Pull tab pivot failure | Tab wiggles relative to slider body; eventually detaches | Cyclic fatigue at pivot point | Replace pull tab before full separation; slider may remain functional |
| Slider drag (early) | Noticeably higher grip force to complete run | Slider channel wear; coil distortion beginning | Light zipper lubricant (wax or silicone); monitor; replace slider if drag increases |
Straps and Webbing
| Failure Mode | What It Looks Like | Likely Cause | When to Act |
|---|---|---|---|
| Bar tack thread fraying | Outermost thread passes of bar tack frayed or abraded; may show as loose thread ends | Cyclic load concentration at bar tack edge; abrasion at hardware contact point | Re-sew bar tack if panel fabric is intact and sewing access is available; replace hardware if hardware edge is abrading thread |
| Webbing delamination/fraying | Webbing edge frays or surface layer separates | Abrasion at buckle edge or triglide bar; UV degradation if polypropylene | Seal edge with lighter or seam sealer if early-stage; replace webbing if structural fraying |
| Foam compression set | Strap permanently thinned; no rebound when compressed | Cyclic load exceeding foam elastic recovery; heat-accelerated relaxation | Replace pad insert or entire strap; no recovery from true compression set |
| Triglide slippage | Strap length changes under load; triglide does not hold position | Webbing too narrow for slot; worn bar surface; polypropylene webbing low friction | Re-size hardware to webbing width; replace worn triglide |
| Ladder-lock failure to grip | Gate releases under load; strap extends | Worn gate teeth; incorrect webbing width; repeated over-cycling of gate | Replace ladder lock; verify webbing width match |
Hardware (Buckles, Rings, Connectors)
| Failure Mode | What It Looks Like | Likely Cause | When to Act |
|---|---|---|---|
| Buckle beam crack | Visible crack across beam on female half; engagement loosens or fails | UV-embrittled resin (POM/nylon 6/6); impact fracture; overload | Replace buckle; cracked resin does not self-arrest |
| Spring fatigue | Buckle engages and disengages with less positive feel; gate “floats” | Cyclic compression past spring elastic limit | Replace buckle; reduced spring force is progressive |
| Plating wear | Base metal (zinc alloy, steel) visible through plated surface | Abrasion; chemical exposure (sweat, moisture) | Cosmetic concern unless corrosion is structural; replace if corrosion is advancing |
| Ring deformation | D-ring or O-ring bent from round under load | Overload at ring; load at unsupported straight bar | Replace ring; deformed ring changes load path and stress distribution |
| Casting seam opening | Thin line opens at casting seam of Zamak ring or buckle | Impact; manufacturing void in casting | Replace immediately; casting seam opening is a structural fault |
Mesh
| Failure Mode | What It Looks Like | Likely Cause | When to Act |
|---|---|---|---|
| Snag (multifilament) | Pulled loop at surface; aperture locally enlarged | External sharp point (key, zip tie, edge) caught yarn | Trim loop flush if not structural; monitor for tear propagation |
| Snag (monofilament) | Clean local break; small hole | Same external cause; breaks rather than loops | Assess hole size; binding reinforcement or patch if load-bearing |
| Pilling | Surface balls of fiber at contact zones | Abrasion of multifilament surface (Martindale mechanism: ASTM D4966) | Cosmetic; pill if preferred; does not indicate structural degradation unless severe |
| Tear at binding edge | Clean or ragged tear initiating at binding termination | Peel load concentrated at binding end; corner stress riser | Reinforce binding corner with bar tack or seam tape if possible; replacement if large |
| Stretch-mesh bagging | Pocket no longer returns to original shape | Elastic creep under sustained load; heat degradation of elastane | Replace pocket if retention function lost |
Insulation Linings
| Failure Mode | What It Looks Like | Likely Cause | When to Act |
|---|---|---|---|
| Film delamination | Bubbling or rippling at seam edges; film peels away from foam | Adhesive failure from repeated flex or moisture; manufacturing defect | Localized: press and re-adhere with compatible adhesive if accessible. Widespread: lining replacement |
| Foam compression set | Lining feels thin and hard; no rebound under finger pressure | Repeated overpacking compressing foam past elastic limit | Replace lining; thermal performance reduced proportionally |
| Film pinhole tears | Tiny holes in metallized film along fold creases | Repeated folding induces crease fatigue; metallized layer is brittle | Moisture now enters foam; patch with compatible tape if small; replacement if extensive |
| PEVA stiffening | Lining becomes rigid in cold environments | PEVA becomes stiffer at low temperatures; normal behavior | Not a defect; design limitation of PEVA; open bag carefully when very cold |
| Seam gap at corner | Visible gap in PEVA or film at bag corner seam | Heat-seal joint failure from impact or repeated flex | Seal with compatible PEVA tape if accessible; limits moisture barrier integrity if unsealed |
Thread and Seams
| Failure Mode | What It Looks Like | Likely Cause | When to Act |
|---|---|---|---|
| UV chalking | White or pale powdery residue on thread tops at exterior seam lines | UV photodegradation of bonded nylon thread (polyester resists better) | Inspect load-bearing seams for separation under gentle peel; replace stitching in structural seams |
| Thread fraying at seam end | Loose thread ends at seam termination | Failed back-tack or knot; abrasion at edge | Re-tack and seal if seam is otherwise intact; trim and seal if cosmetic only |
| Seam separation under peel | Stitches intact but fabric tears at stitch penetration points | Panel fabric is the weak link; stitch density too low for fabric weight | Repair requires wider seam allowance or reinforcement patch; structural concern |
| Skipped stitches | Intermittent gaps in stitch line visible at seam face | Needle-thread tension mismatch; worn needle during original sewing | Assess seam for strength; re-sew critical seams if many skipped stitches in load-bearing area |
| Bobbin thread visibility | Lower-thread loops visible on seam face | Tension imbalance during original sewing | Cosmetic in most cases; inspect for seam integrity under load |
Adhesives, Laminates, and Welded Seams
| Failure Mode | What It Looks Like | Likely Cause | When to Act |
|---|---|---|---|
| Surface haze at fold line | Whitening or cloudiness on film side at a recurring fold; no lift yet | Early adhesive fatigue from cyclic flex at the same hinge; possible mild thermal cycling | Reduce repeated folding at that line; do not iron or apply heat to “fix” the haze; monitor for blistering |
| Localized blister / bubble lift | Discrete area of film raised off face fabric; often at hipbelt fold, roll-top hinge, strap attachment, corner | Adhesive bond failed across blister zone (UV + heat + fold fatigue) | Apply UltraTNT PSA Tape (or equivalent laminate seam tape) per manufacturer instructions over the blister to restore waterproofness; structural face intact |
| Sheet delamination | Diffuse film lift across a broad zone; film no longer flat against face | End-stage adhesive degradation; combined photo-oxidation, thermal creep, and fatigue | Discrete zones can be bridged with seam tape; panel-wide sheet delam is beyond consumer repair - treat as a face-fabric-only bag from this point |
| Heat-creep delamination | Film lift initiated after hot car / dryer / radiator exposure; often distant from fold lines | PU adhesive softened past elastic recovery at elevated temperature | Same response as blister lift if localized; sheet-scale heat damage is generally not recoverable; remove from heat exposure going forward |
| Crossply visible after film lift | Bias-laid grid visible through lifted film; grid intact | Adhesive failed at crossply-to-film interface; crossply itself is structural and not damaged | Film side can be retaped; crossply does not need repair; reading the failure correctly avoids the misdiagnosis “the crossply broke” |
| Welded seam separation | Continuous fused seam line opens; no thread present at the seam | Cohesive failure at the fused interface (heat, fold, age) | Field repair is seam tape over the failed weld as a partial mitigation; full re-welding requires manufacturer service |
| PSA seam tape edge lift | Edge of applied seam tape peels back; tape body still adhered in center | Tape edge snagged or folded across a hinge; aged PSA at the perimeter | Trim back the lifted edge and re-tape if the bond beneath is otherwise intact; replace tape strip if lift exceeds 25% of the application |